

ISMARTGATE FAQ'S
How could we help?
ISMARTGATE FAQ'S
How could we help?
Popular Topics
To disconnect the iSmartgate from Alexa, please follow these instructions:

1. Open the Alexa app and select More.

2. Select Skills & Games.

3. Scroll down and select Your Skills.

4. Select the iSmartgate skill.

5. Select Disable Skill.

6. Select Disable, and your iSmartgate will now disconnect from Alexa.
Please note that the “iSmartgate skill” is only available in the following languages: Italian (IT), German (DE), English (US), Spanish (ES), Spanish (US), French (FR), English (UK).
In case you have an Amazon account in a different Language/Region to one of the languages mentioned above, then you will need IFTTT* to link the iSmartgate to Alexa.
Here are the instructions on how to connect the iSmartgate to Alexa with the skill:
1. Open the Alexa app and select More.
2. Select Skills & Games.

3. Search for the “iSmartgate” skill.

4. Select the skill, then tap Enable to use.

5. Enter the UDI (Unique Device Identifier), found here.
6. Enter the Username
7. Enter the Password
8. Select Authorize
Please make sure that for the username, you enter “admin”, and NOT your name or email address.
*On October 1st, 2025 the iSmartGate integration with IFTTT will be discontinued. The iSmartGate service on IFTTT will no longer be available after this date. We apologise for any inconvenience this may cause you.

9. The iSmartgate is now linked to Alexa. To view it, select Devices > All devices.

10. From this section, you can select it and edit the settings.
To create a new user please follow the instructions below:
Please note that only the admin will be able to create or modify users.

- Access your Ismartgate device through your phone or computer.
- Access the User configuration through the icon on the right corner of the screen.

- Select the option Add User

- Setup the user with the information required.

- The Google Home code is the one required in case you want to operate your door through Google Home or Assistant.
It is required even if it will not be used. It can always be changed from the Users page and changing the configuration for the specific user.

- Restrict the access this user will have to your device.

- Select when will this user be able to access your door.
Restricted access lets you select the days of the week and the time range.

- Select how the users will access your door.
With access through Wi-Fi only, they will need to have access to your network. But they will NOT be able to open or close the door remotely from anywhere in the world as opposite to access through remote access.

- Select the option Create once you have the user configured as you wanted
The ismartgate does not require any additional hardware, software or any subscription fee to be connected to your Smart Home.
The ismartgate connects to your Smart Home. Free.


NO HIDDEN FEES OR ADDITIONAL HARDWARE REQUIRED.
| Main Competitor | ||
| Apple HomeKit | $0 | + $99 Bridge Hardware |
| Google Assistant | $0 | $1/month or $10/year |
| Amazon Alexa* | $0 | No compatible |
| Samsung SmartThings | $0 | No compatible |
| IFTTT* | $0 | $1/month or $10/year |
*On October 1st, 2025 the iSmartGate integration with IFTTT will be discontinued. The iSmartGate service on IFTTT will no longer be available after this date. We apologise for any inconvenience this may cause you.
First of all, the ismartgate requires a sensor to know the status of the door. If you do not have one it can be purchased from one of our shops:
If you have a sensor but is not working, it can be cause by different issues:
- The ID of the sensor is wrong, please see here the instructions to change the ID of the sensor in the doors configuration.
- The battery of the sensor has run out, please see here the instructions to change the batteries of the sensor.
- The sensor needs to be less than 10 meters away from the ismartgate, in direct sight without any obstacles (like a brick wall or a metal door). Please try taking out the sensor and moving closer to the ismartgate. Can you see a status change in the app?

Move the sensor just like the door would.

The ismartgate's status light will blink faster each time it detects the sensor. In case this does not happen please send an email to support@ismartgate.com.
- The sensor is not correctly placed, see the placement of the sensor depending on which type of door you have:
- For GARAGE doors:


- For GATES:


The ismartgate can be powered up with a Solar panel with a battery, with a battery, or directly from your Gate.
But for that it is necessary a converter like this one:
- USA: DC/DC converter.
- Europe: DC/DC converter.
- Australia (Pacific): DC/DC converter.
The instructions to connect this converter to the ismartgate are below:

If you require an extension wire for the power cord here is an example of what you would need.
If instead, you require extension wire for the door connections and /or the wired sensor connections:
- USA: Extension wire.
- Europe: Extension wire.
- Australia (Pacific): Extension wire.
In case you do not know the connections from your opener to power up the device please do not hesitate to contact us at support@ismartgate.com and send us the manual of your opener, or the brand and model so we can find it online.
If you want to change the ID of your ismartgate wireless sensors please follow the instructions below:

- Open your ismartgate app
- Go to Settings

- Select the option Doors

- Scroll down in this page to see the sensor configured.

- Check the ID in the sticker of your sensor and introduce it here.
- Scroll down and press update.
In case you have any issues or questions please do not hesitate to contact us at support@ismartgate.com
The ismartgate does not require any subscription to open /close your door, use IFTTT*, Alexa, Google Home, Homekit, or receive notifications along with many other functionalities.
The only subscriptions available (optional plugins) are associated with Users and Video:
- The Video plugin is required if you want to add a camera to see your garage or gate with the ismartgate app. It is 29,95 USD and it is valid for 3 years. It can be purchased here.
- The ismartgate has a free user plugin for 10 users. In case you require more than 10 users there are two user plugin options:
In case of any further questions please do not hesitate to contact us at support@ismartgate.com
*On October 1st, 2025 the iSmartGate integration with IFTTT will be discontinued. The iSmartGate service on IFTTT will no longer be available after this date. We apologise for any inconvenience this may cause you.
To change the batteries of the ismartgate wireless sensors see the instructions below:
In case you have the Wireless Magnetic sensor

- Open the sensor by unscrewing the 4 screws that it has at the back

- Take out the batteries and introduce 2 new ones. LR1/Type-N 1.5V Batteries
In case you have the Wireless Tilt sensor

- Open the sensor by unscrewing the 4 screws that it has at the back

- Take out the batteries and introduce 2 new ones. LR1/Type-N 1.5V Batteries
If you do not know how to place the sensor on your door please follow the instructions here for Gates and Garage doors.
Please do not hesitate to contact us at support@ismartgate.com in case of any issues or questions.
From the same ismartgate app you can control all the devices you want. In case you have one device configured in your app you can configure a new one or add it directly if it is already configured.
See the instructions below:

- Open your ismartgate App
- Access the Devices option.

- If you want to configure the device as new select the option Install new ismartgate and follow the setup instructions.
- In case you want to add a new device already configured then please select the option Join Existing ismartgate.

- Select the icon next to the UDI to search the devices. Please make sure your phone is connected to the same network as the device you are looking for.

- Then choose the device you want to add to your app. Please make sure that your phone is connected to the same network as the device.
- To change between them you only need to select the name of the device at the top of the screen.
In case you have any issues or questions, please do not hesitate to contact us at support@ismartgate.com
It is possible to receive this notifications from the sensors:
- Temperature notifications: if the temperature rises or drops to a specific temperature.
- Status notifications: if the door is open / closed and left open 10 minutes later + 10 minutes each time. For example: the first notification would arrive 10 minutes after the door was left open, the next 20 minutes later and increasing.
- Battery status of the sensor.
To manage this notifications please follow the instructions below.

- Access your ismartgate via remote access through your computer or phone, or via LAN with your computer through the IP. In case you do not know how to access it through a computer, the instructions are here.
- Access the device configuration through the icon on the right corner of the screen.

- Scroll down the configuration page to go to the option: Alerts.

- Search the phone you want the notifications to be received on, and select the notifications you want to receive.

- In the same page, scroll down to find the sensor notifications configuration in which you will be able to enable and configure the temperature notifications, along with the battery low notification.

- you can set alerts that will let you know if the temperature is lower than the lower limit threshold you decide.
- Or higher than the high limit threshold.
Some doors require the push button to be pressed for longer in order to open or close. With the ismartgate you can define the time you want the connection to be stablished, from 1 second to 40 seconds.
Please follow the instructions below to personalise the time you want the connection to be closed:

- Open your ismartgate App.
- Access the configuration of your ismartgate device

- Select the option Doors.

- Select the option Advanced

- Then choose the time (in seconds) you want the connection to be closed
In case that did not work and your door still does not open or close, please send us an email to support@ismartgate.com with the brand, model of your door and a picture of the wall button (push button).
The ismartgate does not allow the door to be hold open, nevertheless, you can define the time the connection is closed. That means you define the time in which the push button would be pushed.
Please follow the instructions below:
- Open your ismartgate App.
- Access the configuration of your ismartgate device
- Select the option Doors.
- Select the option Advanced
- Then choose the time (in seconds) you want the connection to be closed (push button to be pushed)
To Add an account to the ismartgate App, the device needs to be configured.
In case it is not configured, please follow the instructions here.

- Open your ismartgate App

- Select the option No, Thanks.

- Select the option Join Existing Ismartgate.

- In case you are connected to the same network as the ismartgate, select the icon on the left of UDI. Otherwise enter the UDI of the device, to know the UDI find the instructions here.
- Enter your username
- Enter your password.
- Press Done.
To know the IP address or the UDI of your device open your App or access it through a computer:
In case you do not know how to access your device through a computer, please follow the instructions here.
- Open your ismartgate App
- Go to Settings

- Select the Device option

- Find the UDI and the remote address in red
- And the IP in green
Unfortunately, the ismartgate is not waterproof.
But you can place it inside your Gate's Control Box, or inside a waterproof case like this one:
- USA: waterproof case.
- Europe: waterproof case.
- Australia (Pacific): waterproof case.
The plugins can not be transferred from one device to another.
But in case you had a Gogogate2 with a valid plugin and now you want to use it on your ismartgate device, or even from one ismartgate to another. Please send the UDI of the device holding the active plugin and we will check the time left and send a new activation code valid for the time remaining you had.
Please send us the UDI to support@ismartgate.com
And then activate the plugin with the instructions here for the user plugins, and for the video plugins.
When you purchase a plugin, the activation code will be sent via email, but sometimes this emails get blocked by spam filters. First please check your spam folder.
For us to be able to find the activation code we would need the Reference from your purchase. This Reference is approximately 9 letters and when you purchase on our shop this number will be the unique identifier of your purchase.
Please send us an email to support@ismartgate.com with this Reference ID and we will send the activation code for your plugin.
If you forgot your password please follow the instructions below, from a computer, to be able to change it:

- Access your device and try to enter a password.
- Click on the message that says I forgot my password.

- Enter your username, the Administrator name is admin

- An email will be sent to the email associated to the specific username you entered in the last step.
- Please follow the instructions on the email to restore your password
To see this two devices compared please head to this page.
The Audio-Visual alarm is created to comply with the UL325 security standard in the US. In case you want to disable this alert the security of your door is under your responsibility.
In case you still want to disable it here are the instructions:
- Access your ismartgate via remote access through your computer or phone, or via LAN with your computer through the IP. In case you do not know how to access it, the instructions are here.
- Access the device configuration through the icon on the right corner of the screen

- Go to the option: SOUND

- Please disable the alarm.
Please NOTE that this option is only available on the ismartgate PRO.
It is possible to delete all events created by the opening and closing of the door, to do that, please follow the instructions below:
- Access your ismartgate via remote access through your computer or phone, or via LAN with your computer through the IP. In case you do not know how to access it through a computer, the instructions are here.
- Access the device configuration through the icon on the right corner of the screen.

- Go to the option: Door Events.

- Select the date from which you want to delete the events.
- And select the option Clear Calendar to erase all events from the device.
Please NOTE this option will erase all events from the whole calendar, Except the ones with a video marked as Save.
It is possible to change the name of your device. To do that, please follow the instructions here:
- Access your ismartgate via remote access through your computer or phone, or via LAN with your computer through the IP. In case you do not know how to access it, the instructions are here.
- Access the device configuration through the icon on the right corner of the screen
- Go to the option: DEVICE

- Under the option ismartgate Identifier, please change the name to the one you want and press UPDATE
There are two ways to access your ismartgate device through a computer browser:
- Using the IP that your router has given the ismartgate device.
- Through the remote address, you can use your UDI to access via the URL: UDI.isgaccess.com. Please find the UDI of your device here:

- Open your ismartgate App
- Go to Settings

- Select the Device option

- Find the UDI and the remote address in red
- And the IP in green
After finding that information you will be able to access your device with your remote address or the IP (the IP only if you are connected to the exact same network as the device, a 2.4GHz network)
Unfortunately, the sensors will not work if you do not have an ismartgate device.
The wireless sensor from the Gogogate2 is not compatible with the ismartgate LITE and the ismartgate PRO. As it uses a different frequency to transmit the information.
But please note that the new wireless sensors are improved for the association with IFTTT*, Alexa, Google Home and Homekit. As they detect the door opening, instead of the door opened (fully horizontal position) and closed (fully vertical position) only. They detect the vibrations of the door opening, therefore they can make the detection for IFTTT* triggers more reliable.
The wired sensor is ONLY compatible with the ismartgate PRO:
Here are the connections for door 1:

Here are the connections for door 2:

Here are the connections for door 3:

*On October 1st, 2025 the iSmartGate integration with IFTTT will be discontinued. The iSmartGate service on IFTTT will no longer be available after this date. We apologise for any inconvenience this may cause you.
Video & Cameras
First, make sure that the camera is properly reset.
Press the Reset button at the back until the camera says: Ready for Wi-Fi configuration.
Please do not confuse with: WPS activated

Connect the Ethernet cable directly to the camera and to the router, or the extender power line adapter (Ethernet via power line).

In case you want to connect the Camera to the Wi-Fi with your ismartgate CAM App, please scroll down for the instructions.
To connect your camera to the Wi-Fi with your Computer please use the instructions below:
First of all, please download the program from here:
Make sure that the computer is connected to the same network as the camera.

- Please login into the VMS program once it is downloaded.
The default Login is admin and the password in blank.
- Please go to the option to add a new device.

- If the camera does not appear in the list, please use the option Search.

- If the camera is not configured yet, only connected through Ethernet. the User and password will be admin and blank (no characters).
- If the camera is already configured, then select enter the Username and password associated.
Please make sure it does not use any special characters or symbols.

- Go to the device List and right-click on the camera.
- Select the option Device Settings.

- Select the option Network in the left Menu.

- Select the option Wireless

- Select the option Scan and look for the network you want to connect the camera to.

Wi-Fi configuration from the iSmartGate Camera App

Open the ismartgate Cam App and enter your username (email) and password. In case you do not have an account, please create one.
Once you have accessed the app, select the option ADD CAMERA.

Select Next

Choose the option Alternate Setup.

Choose the option to select the cameras already connected to your Network. Make sure your phone is connected to the SAME network as the Camera.

Select the camera you want to add.

Wait until the camera is correctly added to your account.

Your camera is successfully added to your account.

Select the camera to continue Setup.

Choose a username and password for the camera.
Please do not use any special characters or symbols in case you want to add it to an ismartgate device.

Go to the Camera Settings with the icon on the top-right of the screen.

Select the option Network.

Choose the network you want to connect the camera to.
Please leave the camera still connected to Ethernet for several minutes before unplugging the cord, for the camera to connect correctly to the Wi-Fi.
Please make sure that the network in which the camera is connected is the same as the ismartgate, in case you want to see the camera feed from the ismartgate app. The instructions to connect them are here.
First, make sure that the camera is properly reset.
Press the Reset button on one of the wires connected for at least 30 seconds.

Connect the Ethernet cable directly to the camera and to the router, or the extender power line adapter (Ethernet via power line).
Please make sure that the green light is steady and the orange light is blinking:

In case you want to connect the Camera to the Wi-Fi with your ismartgate CAM App, please scroll down for the instructions.
To connect your camera to the Wi-Fi with your Computer please use the instructions below:
First of all, please download the program from here:
Make sure that the computer is connected to the same network as the camera.
- Please login into the VMS program once it is downloaded.
The default Login is admin and the password in blank.
- Please go to the option to add a new device.
- If the camera does not appear in the list, please use the option Search.
- If the camera is not configured yet, only connected through Ethernet. the User and password will be admin and blank (no characters).
- If the camera is already configured, then select enter the Username and password associated.
Please make sure it does not use any special characters or symbols.
- Go to the device List and right-click on the camera.
- Select the option Device Settings.
- Select the option Network in the left Menu.
- Select the option Wireless
- Select the option Scan and look for the network you want to connect the camera to.
Wi-Fi configuration from the iSmartGate Camera App
Open the ismartgate Cam App and enter your username (email) and password. In case you do not have an account, please create one.
Once you have accessed the app, select the option ADD CAMERA.
Select Next
Choose the option Alternate Setup.
Choose the option to select the cameras already connected to your Network. Make sure your phone is connected to the SAME network as the Camera.
Select the camera you want to add.
Wait until the camera is correctly added to your account.
Your camera is successfully added to your account.
Select the camera to continue Setup.
Choose a username and password for the camera.
Please do not use any special characters or symbols in case you want to add it to an ismartgate device.
Go to the Camera Settings with the icon on the top-right of the screen.
Select the option Network.
Choose the network you want to connect the camera to.
Please leave the camera still connected to Ethernet for several minutes before unplugging the cord, for the camera to connect correctly to the Wi-Fi.
Please make sure that the network in which the camera is connected is the same as the ismartgate, in case you want to see the camera feed from the ismartgate app. The instructions to connect them are here.
- Open your ismartgate App.
- Go to the ismartgate Settings

- Select the option Video

- Select the option to toggle the drop down menu with all the camera brands.

- Select your camera.

- Enter the URL you transformed into public mode.
In case you have any issues with the configuration of your camera, please do not hesitate to send us an email to support@ismartgate.com and we will be happy to assist you.
To configure your camera, please follow the instructions below:
Please note that you need to have the video plugin activated to be able to add a camera, the instructions here.
- Open your ismartgate App.
- Go to the ismartgate Settings
- Select the option Video
- Select the option to toggle the drop down menu with all the camera brands.

- Select your camera.

- Enter the IP of your camera.
- Enter the Username of your CAMERA, not the ismartgate device.
- Enter the Password of your CAMERA, not the ismartgate device.
- Select UPDATE.
In case you have any issues with the configuration of your camera, please do not hesitate to send us an email to support@ismartgate.com and we will be happy to assist you.
To configure your camera, please follow the instructions below:
Please note that you need to have the video plugin activated to be able to add a camera, the instructions here.
- Open your ismartgate App.
- Go to the ismartgate Settings
- Select the option Video
- Select the option to toggle the drop down menu with all the camera brands.

- Select your camera.

- Enter the IP of your camera. To know the IP of your Foscam camera find the search tools here.
- Enter the Username of your CAMERA, not the ismartgate device.
- Enter the Password of your CAMERA, not the ismartgate device.
- Select UPDATE.
In case you have any issues with the configuration of your camera, please do not hesitate to send us an email to support@ismartgate.com and we will be happy to assist you.
In case you want the IP of the iSmartGate camera not to change and not have to configure the camera every time, then follow the instructions below:
- Connect to the camera's configuration page from your computer. Use the IP and port known from here and introduce it into the browser, this will be the outcome:

- From the browser page please login with your user and password set in the configuration of the camera.
- Please select the option Network --> IP Configuration:

- Then, please disable the checkbox: Obtain IP from DHCP:

Now the IP shown there will be the IP for the camera, and that will not change.
Connect your IP Camera with your ismartgate
Your ismartgate Cam can NOW be paired with the ismartgate! This will allow you to remotely control, monitor and watch your garage door or gate from a single app.
Note: If your ismartgate Cam is not yet configured, please follow the instructions here for the indoor, and here for the outdoor camera.

1. Open the "ismartgate" app.

2. Press the "Config" icon.

3. Login using the admin credentials:
a) Login
b) Password (same used during setup)
Click “Sign In”.

4. Select the "VIDEO" option.

5. In the Video menu, choose the “Door” that you want to video monitor.
NB: If you have no video plugin, do not forget to get one.

6. Choose the brand of your IP Camera: "ISMARTGATE CAM"

7. Select the option SEARCH ISMARTGATE CAM

8. The app will search within the same exact network the ismartgate is connected to, please make sure the camera is connected to that exact same network (2.4GHz). Select your camera.

9. The app will automatically fill in the information from the camera, you will only need to introduce the username and password. From the CAMERA, not the ismartgate.

10. Your ismartgate Cam is now successfully connected to your ismartgate.
In case the ismartgate App is not able to access the feed from the iSmartGate Cam, the problem most likely is that the IP of the camera has changed. There are two options to know the IP of your camera:
- Access the IP of your camera through the iSmartGate cam App:


- You can connect to the Camera with your computer by executing the Search Tools software provided in the CD that comes with the camera, or from the instructions here.


Once you have the IP of your camera, then you need to introduce it in the video configuration on your ismartgate App:
- Open your ismartgate App
- Go to the configuration of the device

- Select the option Video

- Select the dropdown menu to select the correct camera

- Select iSmartGate Cam in the dropdown menu for the cameras

- Choose your model, this option for the Indoor camera.

- This case for the Outdoor camera.

- Enter the IP from the instructions above and the login and password used to configure the iSmartGate Cam (NOT the ismartgate device)
Then the camera should be working. In case you want the IP not to change and not have to do this every time, then follow the instructions below:
- Connect to the camera's configuration page from your computer. Use the IP and port known from before and introduce it into the browser, this will be the outcome:
- From the browser page please login with your user and password set in the configuration of the camera.
- Please select the option Network --> IP Configuration:
- Then, please disable the checkbox: Obtain IP from DHCP:
Now the IP shown there will be the IP for the camera, and that will not change.
The instructions to activate a purchased video plugin with its activation code are:
NOTE: In case you did not receive the activation code of your purchased plugin, please head here.
- Access your ismartgate via remote access through your computer or phone, or via LAN with your computer through the IP. In case you do not know how to access it, the instructions are here.
- Access the device configuration through the icon on the right corner of the screen
- Go to the option: VIDEO

- Please select the option Get Plugin

- Enter the activation code
- Enter the text on the image
Network
When the router was changed the device stoped connecting to your network, and therefore you can no longer access your device.
It is necessary to reset the device, the instructions are here. And then setup your device again with the new network information.
The ismartgate is compatible with the connection via Ethernet with an adapter.
See here an example of an adapter that would work:
- USA: Ethernet adapter
- Australia (Pacific): Ethernet adapter
- Europe: Ethernet adapter
It would be necessary to plug the Ethernet adapter in the USB port of the ismartgate:

There are two ways to connect the ismartgate via Ethernet:
- One would be setting up normally via Wi-Fi, and once the device is fully configured with all doors and corresponding sensors then plug in the USB to Ethernet adapter. Please go to Setup with the buttons below:
- The other would be to plug in the Ethernet adapter and follow the instructions below:
HomeKit
To add a second iSmartgate to HomeKit, you need to force the sync with iCloud.
Please turn OFF your iPhone (to force the sync with iCloud), and then reset the iSmartgate device by pressing and holding the small button for 10-15 seconds until the Wi-Fi light turns off, then wait for 2 minutes for the Wi-Fi light to turn on in BLUE.
Turn your iPhone ON again, then try setting up the iSmartgate device: https://setup.ismartgate.com/fallos-iphone-reset-red-light/
To add your ismartgate already configured to Homekit please follow the instructions below:
Please note that if you want to share your home with your family, please use the instructions here.
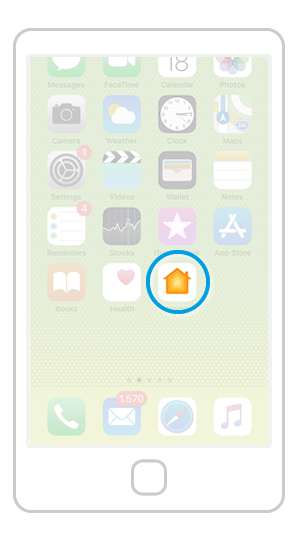
Go to "iPhone main screen" on iPhone and open the “Home” app.
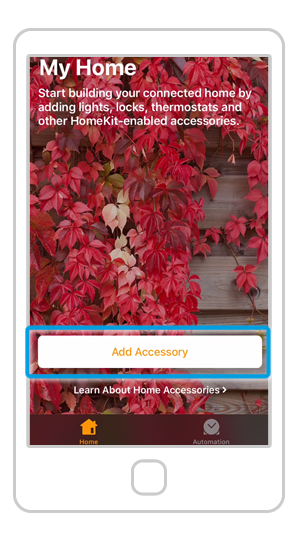
Select the “Add Accessory”option.
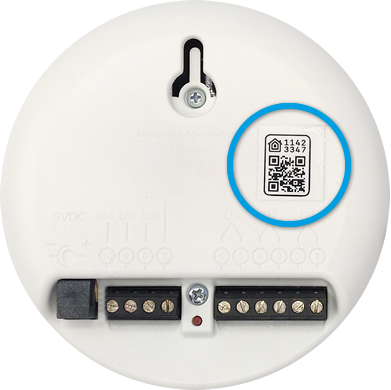
The QRis located at the back of the ismartgate device.
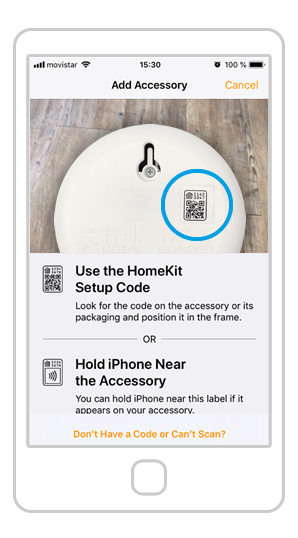
Scan the QR codefound on the back of the ismartgate device.
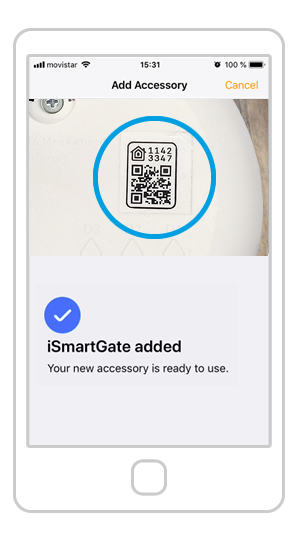
If you’ve successfully read the QR code, you should see the same screen as per above.
Unfortunately, the iSmartGate cameras are NOT compatible with Homekit.
The camera feed will ONLY be seen from the ismartgate App, not from your Home app.
This error message can be caused by different issues:
- The sensor ID is not correctly introduced in the doors configuration. The instructions to change it are here.
- The sensor batteries ran out. The instructions to change them are here.
- The sensor is not working, follow the instructions here to check if everything is correct.
- The ismartgate is not configured. The ismartgate is a Hub to link Homekit with a gate or garage door. To work it requires the device to be fully configured, at least one door enabled.
- In case there is an automation but you do not have an Apple TV or a bridge, it will not work.
HomeKit only has the accessory created for Garage doors, not Gates. You can use a Gate without an issue, but the icon and the home app will treat the gate as a Garage door accessory.
Here is a list of all accessories that Apple has available, there is only Garage set as door.
Homekit is compatible with Carplay since the iOS 13 version, which allows the use of Siri to open your Garage or Gate using CarPlay without the need for confirmation. Here is the information about Carplay and Homekit.
Unfortunately, the remote access is not allowed with HomeKit Unless you have an Apple TV (since the 4th Generation) and / or a HomePod connected to your Home network, to be the one that sends the instruction to open or close the door to the ismartgate.
You can even associate an iPad to act as a bridge, here are the instructions to make the Apple devices compatible a Bridge.
Please note that to create Automations you would have the same requirement as for the remote access. Here is more information about automations.
Alexa
To disconnect the iSmartgate from Alexa, please follow these instructions:
1. Open the Alexa app and select More.
2. Select Skills & Games.
3. Scroll down and select Your Skills.
4. Select the iSmartgate skill.
5. Select Disable Skill.
6. Select Disable, and your iSmartgate will now disconnect from Alexa.
Please note that the “iSmartgate skill” is only available in the following languages: Italian (IT), German (DE), English (US), Spanish (ES), Spanish (US), French (FR), English (UK).
In case you have an Amazon account in a different Language/Region to one of the languages mentioned above, then you will need IFTTT* to link the iSmartgate to Alexa.
Here are the instructions on how to connect the iSmartgate to Alexa with the skill:
1. Open the Alexa app and select More.
2. Select Skills & Games.
3. Search for the “iSmartgate” skill.
4. Select the skill, then tap Enable to use.
5. Enter the UDI (Unique Device Identifier), found here.
6. Enter the Username
7. Enter the Password
8. Select Authorize
Please make sure that for the username, you enter “admin”, and NOT your name or email address.
*On October 1st, 2025 the iSmartGate integration with IFTTT will be discontinued. The iSmartGate service on IFTTT will no longer be available after this date. We apologise for any inconvenience this may cause you.
9. The iSmartgate is now linked to Alexa. To view it, select Devices > All devices.
10. From this section, you can select it and edit the settings.
To connect your Alexa to your ismartgate Device you need IFTTT*. In case you want to create a new applet, the instructions to do so are here.
If you do not have your ismartgate associated you can associated the moment you create the applet below or follow the instructions here.
Below you will find the instructions to create an applet that will allow you to open or close your door by saying a specific phrase to Amazon Alexa.

- Open your IFTTT* app.
- Select the option Get More.

- Here you are able to create a new applet or search for any service you may want to associate with IFTTT*.

- Search for the service GarageWi-Fi & Gates.

- Select the applet you want to create.

- Slide to associate Alexa to the ismartgate through IFTTT*. In case you do NOT have either Alexa or the ismartgate connected to IFTTT* it will ask you to connect them.

- Configure the Applet as you want, select the phrase you will say to Alexa in order to open or close the door.

- Select the door you want to open or close with Alexa.

- Enjoy your new applet.
Please note that if you want to use Alexa to close the door you would need to repeat this process to create a new Applet to close.
If you have more than one door, you would need to repeat both applets for all the doors you have.
The phrase used to trigger Alexa NEEDS to have the word Trigger in it, but IFTTT* will add automatically that prefix on the phrase so you do NOT need to write it when setting up the applet, but please make sure you SAY it when you want Alexa to open the door. The rest of the phrase can be anything else, like the name of the door if you have more than one.
*On October 1st, 2025 the iSmartGate integration with IFTTT will be discontinued. The iSmartGate service on IFTTT will no longer be available after this date. We apologise for any inconvenience this may cause you.
IFTTT
If you want to disconnect your ismartgate from IFTTT* please follow the instructions below:

- Open your IFTTT* app.

- Search the service in that page to look for the services you have connected.

- Select the configuration option at the top-right of the screen

- Select the option to Remove.

- Select Remove and your device will no longer be associated to IFTTT*.
Please note that you will only be able to add ONE ismartgate to your IFTTT* account.
*On October 1st, 2025 the iSmartGate integration with IFTTT will be discontinued. The iSmartGate service on IFTTT will no longer be available after this date. We apologise for any inconvenience this may cause you.
If you want to open or close the door automatically at a specific time please follow the instructions below:
Please note that you will need to use IFTTT*, to connect your device to IFTTT* follow the instructions here.
- Open your IFTTT* App
- Go to Get More at the bottom of the screen.

- Select the option IfThisThenThat to create a new applet.

- Select the option +This to select the trigger.

- Search for the service Time.

- Select the option that fits your needs.

- Select the time.

- Select Continue to confirm the trigger.

- Select the +That option to choose the Action.

- Search for the GarageWi-Fi & Gates service.

- Select the action you want to be executed at the specified time.

- Select the door you want and Continue to confirm the action.

- Edit the title to be what you want and finish the applet.
Please note that if you want to open AND close, you will need to have one applet to open and one applet to close.
In case of any issues or questions please do not hesitate to contact us at support@ismartgate.com
*On October 1st, 2025 the iSmartGate integration with IFTTT will be discontinued. The iSmartGate service on IFTTT will no longer be available after this date. We apologise for any inconvenience this may cause you.
If you want to open or close the door with a button widget please follow the instructions below:
Please note that you will need to use IFTTT*, to connect your device to IFTTT* follow the instructions here.
- Open your IFTTT* App
- Go to Get More at the bottom of the screen.
- Search for the GarageWi-Fi & Gates service.
- Select the option services.

- Select the applet you want to configure. To open or to close.

- Slide to activate the applet.

- Configure the Applet as you wish.

- Select the door you want to open.

- Enjoy your new applet.
Please note that if you want to open AND close, you will need to have one applet to open and one applet to close.
In case of any issues or questions please do not hesitate to contact us at support@ismartgate.com
*On October 1st, 2025 the iSmartGate integration with IFTTT will be discontinued. The iSmartGate service on IFTTT will no longer be available after this date. We apologise for any inconvenience this may cause you.
If you want to open the door automatically whenever you get close to home please follow the instructions below:
Please note that you will need to use IFTTT*, to connect your device to IFTTT* follow the instructions here.
- Open your IFTTT* App
- Go to Get More at the bottom of the screen.
- Search for the GarageWi-Fi & Gates service.
- Select the option services.

- Select the applet you want to configure. To open or to close. You will need one applet for each. Please note that the area needs to be bigger in the applet to open.

- Slide to activate the applet.

- Configure the Applet as you wish. Please make the Area range bigger in the applet to open and smaller for the applet to close.

- Select the door you want to open.

- Enjoy your new applet.
Please note that if you want to open AND close, you will need to have one applet to open and one applet to close.
In case of any issues or questions please do not hesitate to contact us at support@ismartgate.com
*On October 1st, 2025 the iSmartGate integration with IFTTT will be discontinued. The iSmartGate service on IFTTT will no longer be available after this date. We apologise for any inconvenience this may cause you.
Please follow the instructions below to connect your ismartgate device to an IFTTT* account:
- Open your IFTTT* App
- Go to Get More at the bottom.
- This is the page you will find in Get More. In case you want to add a new applet please select the option IfThisThenThat.

- Search for the GarageWi-Fi & Gates service and select the first applet that appears.

- Slide to connect your ismartgate to IFTTT*.

- Enter the remote address, obtained from here.

- Now you have your ismartgate associated with your IFTTT account, in case you do not want or need this applet you can disable it now, the connection will remain.
Please note that IFTTT* does NOT allow the association of more than one device to the same account. In case you have another ismartgate it would be necessary to create another IFTTT* account to associate it to.
*On October 1st, 2025 the iSmartGate integration with IFTTT will be discontinued. The iSmartGate service on IFTTT will no longer be available after this date. We apologise for any inconvenience this may cause you.
Unfortunately, IFTTT* only allows the association of one device for each IFTTT* account.
It would be necessary to create a new IFTTT* account and associate the other device to that account.
*On October 1st, 2025 the iSmartGate integration with IFTTT will be discontinued. The iSmartGate service on IFTTT will no longer be available after this date. We apologise for any inconvenience this may cause you.
Google Home
If you want to disconnect your ismartgate to your Google Home account please follow the instructions below:

- Open your Home app.
- Select any door from the ismartgate device associated.

- Select the option unlink ismartgate

- Choose the option unlink

- Select the service ismartgate. It should appear as it is already connected.

- Select the option to unlink account.

- Select the option unlink.

- Go back to the main screen.

- Now your device is no longer associated with your Google Home account.
Please note that you will only be able to add ONE ismartgate to your Google Home account.
If you want to connect your ismartgate to your Google Home account please follow the instructions below:

- Open your Home app.
- Select the option Add.

- Select the option Set up device

- Choose the option Works with Google to select the service you want to add.

- Search for the service ismartgate.

- Enter the UDI of your ismartgate, this information can be obtained from here.
- Enter your username.
- Enter your password.

- Select the door you want to configure.

- Here you will be able to change the settings on each of your doors.
Please note that you will only be able to add ONE ismartgate to your Google Home account.
To associate an ismartgate already configured to Google Assistant please follow the instructions below:
Unfortunately only one device can be associated to Google Home and / or Google Assistant.
The native default browser that comes with Samsung phones does not work with the webpage to associate the device with Google Home. It is necessary to use Google Chrome.
To make Google Chrome your default browser please follow the instructions below:
To setup Google Chrome as your default browser on any Android Phone:
- On your Android, find Google settings in one of these places (depending on your device):
- Open your device's Settings app. Scroll down and select Google.
- Open a separate app called Google Settings
 .
.
- Tap Apps.
- Open your default apps:
- In the top-right, tap Settings
 . Under 'Default', tap Browser app.
 - Tap Advanced
 Default apps Browser app.
- In the top-right, tap Settings
- Tap Chrome .
For any further information, see here.
Google Assistant and Google Home require a security code to make sure you are the one asking for the opening or closing of the door.
This code, for the Administrator user, is setup when the device is configured for the first time. Every time the Administrator creates a user it needs to create this code for each.
Google Home asking for pin code. How to get it or change it?
For the Admin to change this code it would be necessary to follow the instructions below:
- Open your ismartgate App
- Go to your device's User settings

- Select the User you want

- Select Edit

- Change the Code
SmartThings

- Open the SmartThings app.
It needs to be the newest app, not SmartThings Classic.

- Select the + icon at the top-right of the screen.

- Select the option Devices.

- Select the search icon at the top-right.

- Search for ismartgate and select it.

- Select the Garage door.

- Select the ismartgate service.

- Select the Room to add the ismartgate in, or create a new one.
- Then select Next.

- Enter the UDI (Unique Device Identifier), the instructions to know that identifier are here.
- Then enter your username.
- Then enter your password.
Please make sure you are entering as login: admin, NOT your name or email, in case you are the administrator.

- Select Done at the top-left of the screen, and go back a few screens to be in the main page again.

- Select Done at the bottom-right of the screen.

- You now have the ismartgate linked to your SmartThings account, and you can see it in the Devices section.
Before setting up Geofencing, you need to connect your iSmartgate to SmartThings. Follow our guide here: How to connect iSmartgate to SmartThings
Once your iSmartgate is connected to SmartThings, follow these steps to set up Geofencing:
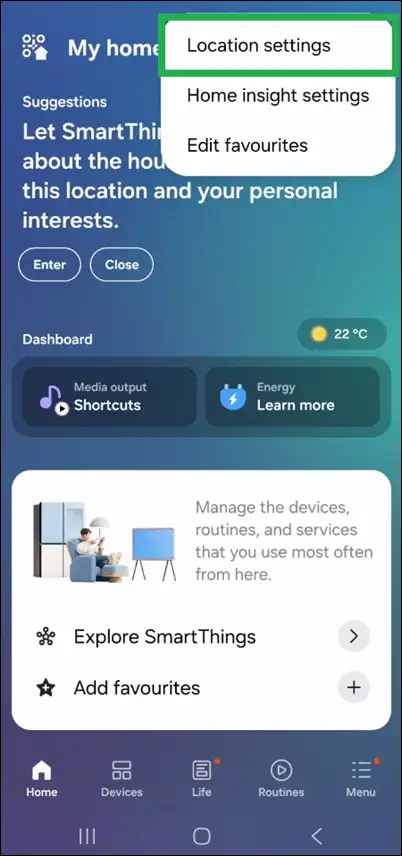
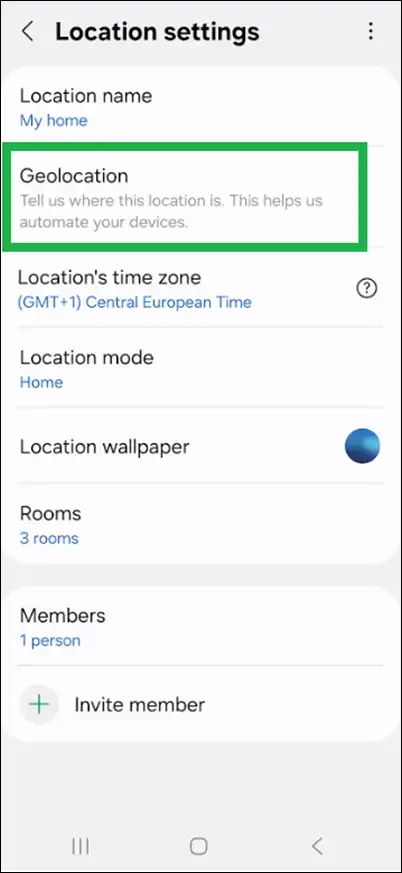
1) Set up your home location: In the SmartThings app, go to Settings → Location Settings. Make sure your address is correct, and define a Geofence radius (150–300 m recommended).
2) Enable location access: Make sure your phone’s location services are on and SmartThings has “Always” access to your location.
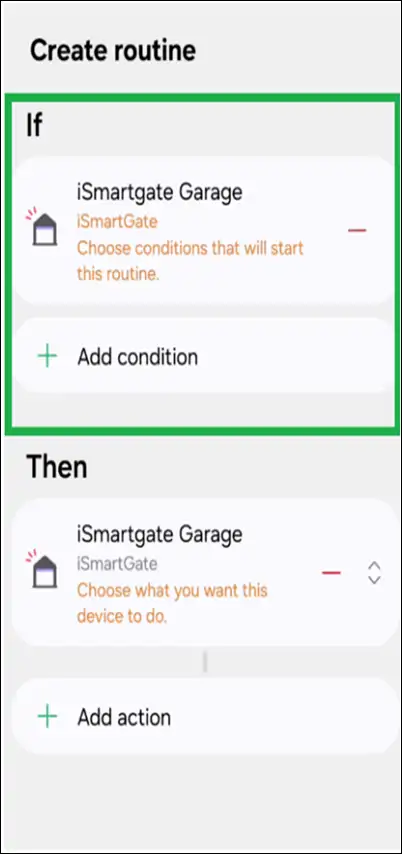
3) Create the Geofencing automation:
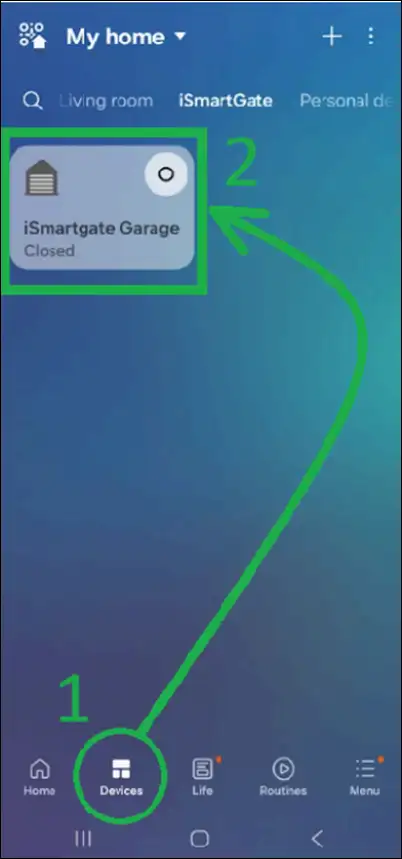
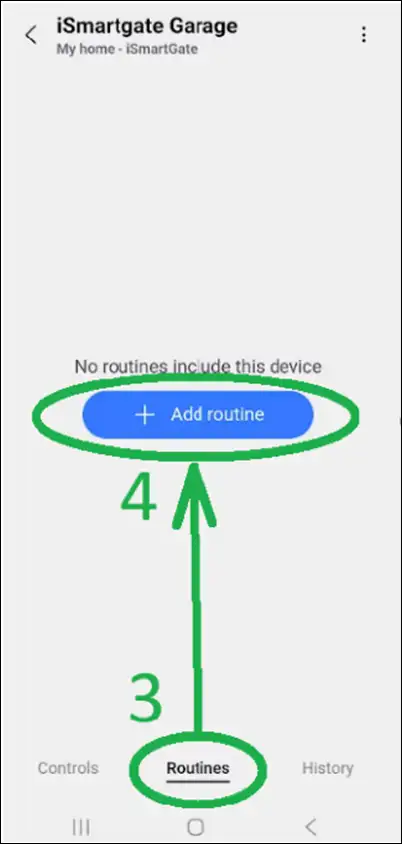
- Go to Devices → Select the iSmartgate door → Routines → Add Routine
- Configure the Routine (IF):
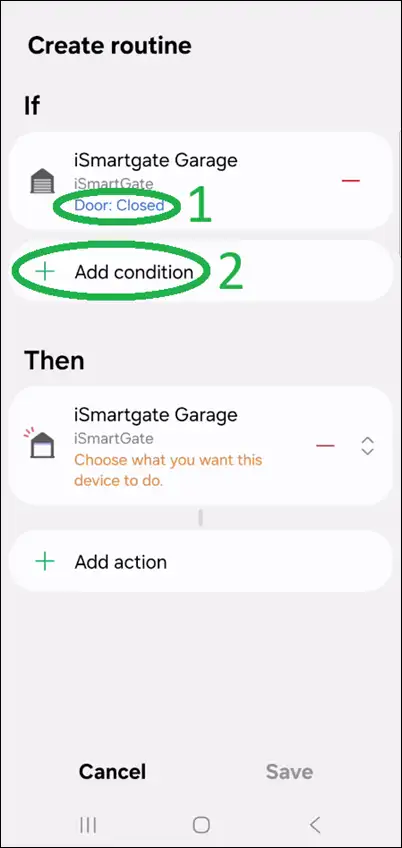
- Select Add Condition → Member Location
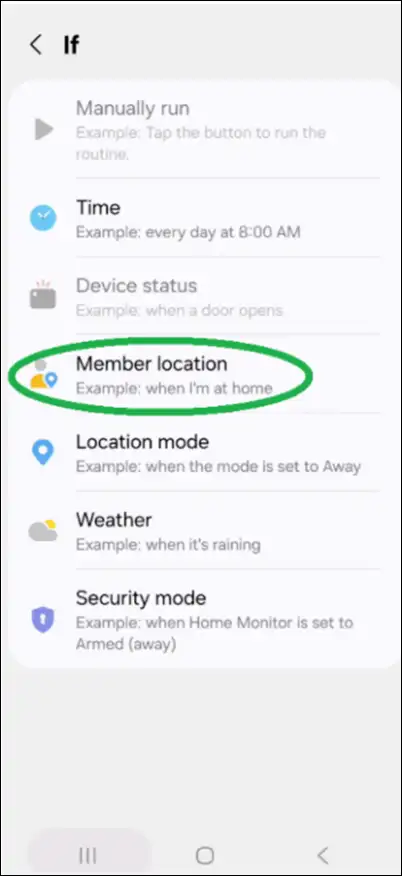
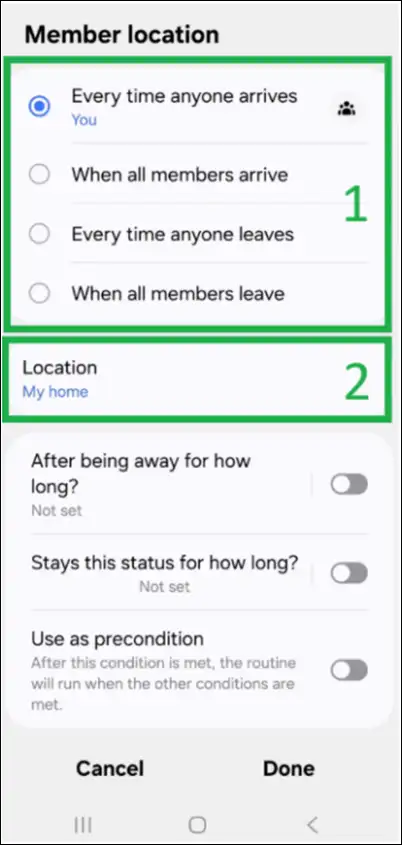
- Choose Every time anyone arrives (to OPEN the door), or Every time anyone leaves (to CLOSE the door) → Location: My home
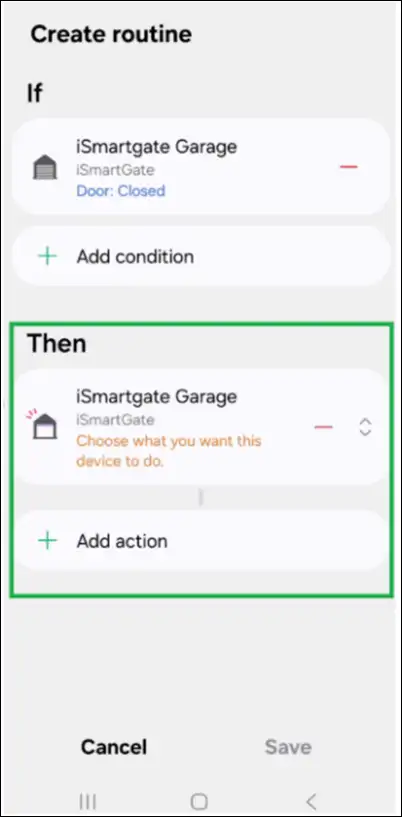
- Set the action (THEN): select your iSmartgate device, then choose OPEN or CLOSE.
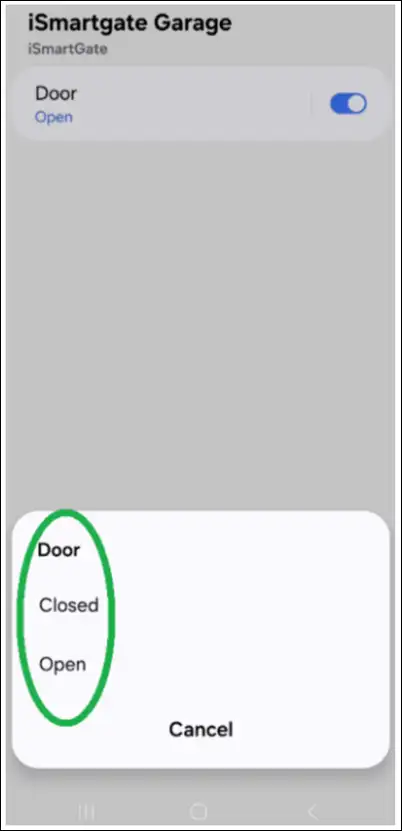
- Once you have selected the preferred option (OPEN or CLOSE), your routine should look similar to the example below:
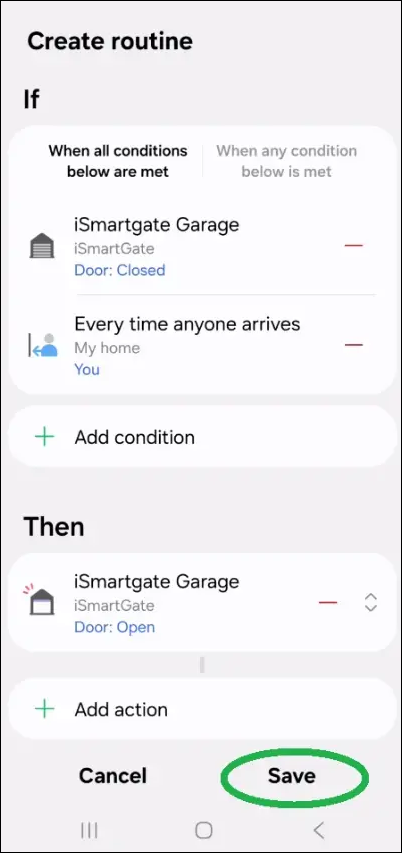
- Select Save to confirm the settings. Geofencing should now be active.