

HomeKit garage door opener setup using ismartgate
Setting up your garage door opener with HomeKit using ismartgate.

HomeKit garage door opener
By integrating an iSmartGate, you can effortlessly connect your current garage door opener to Apple HomeKit. iSmartGate is compatible with a wide range of garage door openers. Once installed, you can utilize the following voice commands:
- Open garage door.
-Close garage door.
-Is garage door open?
Which ismargate models work with Apple HomeKit?

How to set up ismartgate with Apple HomeKit?
You can set up the Apple HomeKit integration by following the following steps:
Step 1
Make sure that your ismartgate is installed and set up correctly.
Follow our Step by Step Guide to install your smart garage door.
Step 2
Go to the “Home” app
Go to your main screen and open the “Home” app.

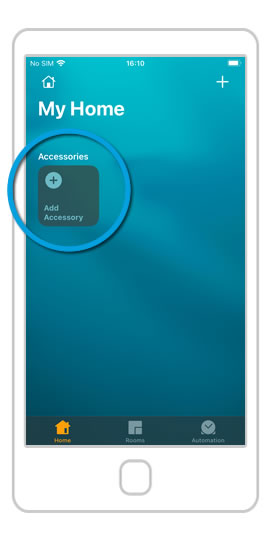
Step 3
Add Accessory
Select the “Add Accessory” option.
Step 4
Scan the QR code
Please make sure your phone is connected to a 2.4GHz network, the one you want the ismartgate to connect to.

Step 5
“Add to Home”
If the connection is succesful, press the “Add to Home” button.

Step 6
Connecting to Garage Door
Now your ismartgate is connecting to your Wi-Fi network. Wait 30s seconds …

Step 7
Bridge Location
1. Assign a “room” for the device (ie. garage).
2. Press “Continue”.

Step 8
Garage Location
1. Assign a “room” for the garage Door (ie. Garage).
2. Press “Continue”.

Step 9
Home App
On the Home App, you should see the doors available, but you need to finish the configuration in the ismartgate app in order to use them.

Step 10
ismartgate App
Go to phone main screen and open the ismartgate app “again”.
![]()
Step 11
ismartgate App
You will be back to the same step you were before “Wi-Fi Connection”.
Be sure that your iphone is connected to the same Wi-Fi as the ismartgate.
Click “Next”.

Step 12
Devices
The app will now look for devices to connect. Once found, you will see an icon of your ismartgate device. Click on it.
If the “iSmartgate Access App” doesn’t find your “ismartgate device”, follow these steps:
1) Go to your iPhone main settings
2) Go to Privacy > Local Network
3) Be sure that the “iSmartgate” has this permission enabled.

Step 13
Configure Doors
It is now time to program your ismartgate:
1. Choose your preferred language
2. Press “Next”.

Step 14
Configure Doors
Define how many doors you want to control:
1. Start “Enabling” DOOR 1
2. Scroll down.

Step 15
Configure Doors
(1) Fill the following fields:
1.Door mode: Garage / Gate
2.Door Images: Default / Custom (you can upload pictures of your garage door open/closed)
3.Door name
4.Sensor type. Check carefully!
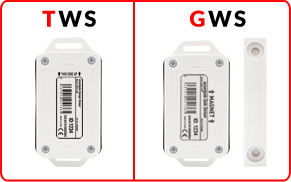
5. Sensor ID
(2) Scroll down

Find the complete ismartgate HomeKit setup ismartgate HomeKit Setup
If you have any questions, please feel free to contact us at support@ismartgate.com